Compared to hard disk drives (HDDs), solid-state drives (SSDs) have gained popularity among PC enthusiasts due to their superior speed and reliability. If you’re using an HDD and seeking an upgrade or building a new desktop PC, opting for an SSD will significantly enhance your computer’s performance.
Tasks such as loading apps and copying files will be noticeably faster. Now, let’s proceed with the step-by-step process of installing an SSD on your desktop PC. While the installation itself isn’t overly challenging, it can be intimidating for new PC builders.
However, there’s no need to worry. We’ll guide you on how to install an ssd in your desktop PC, select a compatible SSD, locate the appropriate slot, and install the storage drive on your desktop.
How to Install an SSD in Your Desktop PC
Check SSD Compatibility with Motherboard
Almost all modern motherboards support NVMe SSDs up to a specific generation, with many currently available models accommodating NVMe Gen 4 SSDs. These slots are also backward compatible with Gen 3 SSDs.
It is advisable to configure M.2 slots in your BIOS before proceeding with the SSD installation. If you are considering purchasing a budget-friendly SSD, we have compiled a list of the best options for you to explore.
In addition, there are SATA SSDs available in either a 2.5-inch or M.2 form factor. It’s important to note that the slot for plugging in an M.2 SATA SSD is different from that of an NVMe M.2 SSD.
To determine the available M.2 slots on your motherboard, refer to the motherboard manual. Furthermore, certain motherboards now offer support for NVMe Gen 5 SSDs, which are compatible with Intel’s 13th Gen Raptor Lake CPUs and Ryzen 7000-series CPUs.
However, these newer SSDs are currently released and are typically more expensive.
Migrate or Install the Operating System
Ensure you prepare to migrate your current operating system (OS) or have an installation disk ready for a new OS. We advise against cloning Windows partitions onto a new SSD, as it can occasionally result in issues based on our experience.
The recommended approach is to back up all your data and perform a clean installation of Windows 11 on your new SSD. However, if you wish to keep your OS partition and its data, there are various OS migration tools available for that purpose.
Check for Required Power Cables
The power supply (PSU) for your PC contains various connectors that plug into the motherboard. One of these connectors is the SATA power connector, which is necessary for installing a 2.5-inch SATA SSD on your PC.
Ensure you have this connector readily available. Moreover, you will also need a SATA cable, typically provided in your motherboard box or available for purchase online. SATA power connectors and cables typically have this appearance.
Necessary Tools
It’s important to have the necessary tools when installing the SSD in your PC build. In this case, you will need a Philips Head screwdriver. Additionally, make sure you have the mounting screws, which are provided with the motherboard for M.2 SSDs or with the PC case for 2.5-inch SATA SSDs.
Prior to installation, ensure that your workspace is clean and organized and that you have the motherboard manual accessible to confirm specific details that may vary between boards. Lastly, remember to ground yourself to prevent electrostatic damage. Wearing an anti-static wrist bracelet is a reliable way to achieve this.
How to Install M.2 SSD in Your PC
Before you begin installing the SSD, use a Philips Head screwdriver to open the side panels of your PC case. This will grant you access to the motherboard and its different ports. Additionally, it’s important to enter the BIOS on Windows 11 and modify the settings to ensure you select the appropriate NVMe generation for your SSD.
Installation Guide for M.2 NVMe SSD
- Begin by confirming which M.2 slot on your motherboard supports the NVMe standard. Modern motherboards typically have different M.2 slots that can accommodate either a SATA M.2 SSD or an NVMe M.2 SSD. Refer to your motherboard manual to identify the specific location of NVMe M.2 slots, as this will be the appropriate position to install your M.2 NVMe SSD.
- If your motherboard has an SSD heatsink cover, open it up before proceeding with the installation.
- Insert your NVMe SSD into the motherboard’s NVMe M.2 slot at a 45-degree angle.
- Once the SSD is properly slotted in, press down on the opposite end to secure it. A standoff will be present under the M.2 slot, providing a firm resting place for your NVMe SSD. If your motherboard has a toolless installation method for the standoff, refer to the motherboard manual for guidance if you encounter any unfamiliar steps.
- Place the heatsink cover back on top of the NVMe SSD. The screw for the cover should align with the SSD and its standoff underneath. Proceed to screw in the SSD by reattaching the heatsink.
- Congratulations! You have now successfully installed an NVMe M.2 SSD on your computer. You can proceed to the next section where we will verify if the SSD install correctly and prepare it for use.
Installation Guide for M.2 SATA SSD
If you are considering installing an additional M.2 SATA SSD or upgrading an existing one, it is important to confirm which M.2 slot on your motherboard supports SATA SSDs. Refer to your motherboard manual to determine the specific slot that is compatible with SATA SSDs.
- Modern motherboards feature specific M.2 slots that support SATA SSDs. These slots are typically located at various positions, often towards the bottom of the motherboard. To determine which M.2 slot on your motherboard supports SATA SSDs, consult the motherboard’s manual for guidance.
- Once you have identified the appropriate M.2 slot, you can proceed with the installation of the M.2 SATA SSD using the same method as described above for the NVMe SSD. The only difference is that you need to ensure you install it in the SATA M.2 port instead.
How to Install 2.5-inch SATA SSD in Your PC
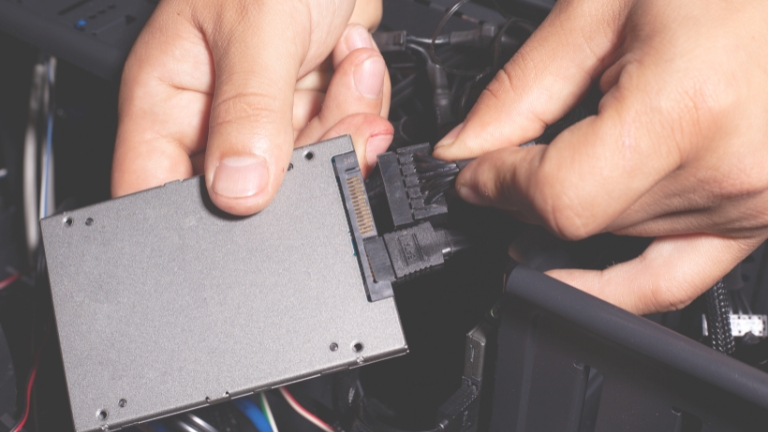
- Begin by confirming the location of the SATA slots on your motherboard. Then, take a SATA cable and connect one end to the corresponding SATA female connector on the motherboard.
- Locate the appropriate position in your PC case where a 2.5-inch SATA SSD can be mounted. Place the SSD in that position and secure it using the case screws provided for drive installation in the storage bay. You will need a Philips Head Screwdriver for this step.
- Connect the SATA power connector to the SSD, and attach the other end of the SATA cable to the SSD. You can trace the cables of your power supply to find the SATA power connectors.
- Congratulations! You have successfully learned how to install a 2.5-inch SATA SSD on your PC. However, there are a few more tasks remaining. Access the BIOS to ensure that your new SSD is recognized by the system. Then, format the SSD to make it ready for use.
Check Your New SSD Is Installed Correctly
To confirm that your new SSD is installed correctly, you can follow these steps:
- Power on your computer and enter the BIOS or UEFI settings by pressing the designated key during startup (commonly Del, F2, or Esc).
- Navigate to the “Storage” or “Drives” section in the BIOS/UEFI settings.
- Look for the detected drives or storage devices list. Your newly installed SSD should be listed along with other storage devices connected to your system.
- Verify that the SSD is recognized by checking its model name or capacity displayed in the BIOS/UEFI.
- Exit the BIOS/UEFI settings and proceed to the operating system.
- Once you’re in the operating system, open the Disk Management utility (in Windows, you can search for “Disk Management” in the Start menu).
- In Disk Management, locate your SSD and ensure that it is listed as a healthy and usable drive.
By following these steps, you can confirm that your new SSD install correctly and recognize by both the BIOS/UEFI and the operating system.
Conclusion
In conclusion, how to install an ssd in your desktop pc is a straightforward process that can greatly enhance your computer’s performance. Whether you choose an NVMe M.2 SSD or a 2.5-inch SATA SSD, the steps involve identifying compatible slots on your motherboard, preparing the necessary tools, and securely connecting the SSD to the appropriate connectors.
By following the step-by-step instructions outlined in this guide, you can confidently install an SSD in your desktop PC and experience faster app load times, improved file transfers, and overall enhanced system responsiveness.
Remember to consult your motherboard manual for specific instructions and configurations, and always ensure you take necessary precautions such as grounding yourself to avoid electrostatic damage. With a successfully installed SSD, you can enjoy the benefits of faster and more reliable storage, optimizing your computing experience.